


Directions:
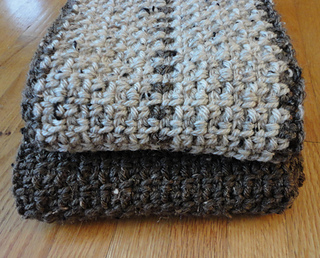
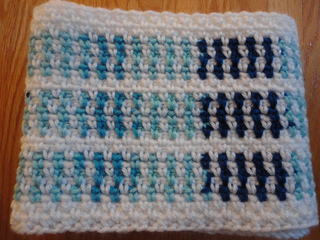
A super fast men’s scarf of which I made several for a local charity.
Measurements: 7” wide x 6’ long
Materials:
3 balls 85g, 133m
Yarn:
Lion Brand Vanna’s Choice
or approx. 400m of aran yarn (machine washable/dryable for this case)
6.5mm crochet hook, or as required for tension
yarn needle for weaving ends
Tension:
Stitch:
Granite stitch (ch1, sc in ch sp) on 6.5mm, 14 sts x 17 rows = 4”
If you want an exact length, make a swatch about 20 sts wide x about 5” tall. Then do a little math to see how many stitches
you need to start. I suggest at least 5” tall because, this stitch pattern pulls in/shortens the original chain.
Your gauge: (20 sts x 72) divided by the width of your swatch ___” = _____ sts to chain to start
Or for another length: (20 sts x desired length) divided by the width of your swatch ___” = _____ sts to chain to start
Pattern Notes:
This scarf is made in what I believe is called Granite Stitch, worked flat, back and forth along the length.
I first learned this stitch making the Calm Cowl by Suzana Davidovic (Twitchy on Ravelry.)
When turning at the ends, be sure to find the first chain space to single crochet into or you might accidentally decrease.
I also made one of these with 1 ball (198g/333m) of Red Heart Super Saver and using it all up, it came out 6” wide.
Techniques used:
Crochet chain, single crochet, slip stitch, working in the “butt” loop, and working in the chain space.
The “butt” loop is the little bump on the bottom, or back side, of the chain stitch. Working in this to start gives the beginning
and ending edges the same finish/look where the chains all face out.
Abbreviations:
ch chain sc single crochet ch sp chain space st stitch
Directions:
Ch 253, turn.
R1: (working into the “butt” loops) sc in 3rd ch from hook, (ch1, skip 1ch, sc1) to end, ch2, turn.
R2: (sc in “butt” loop of original chain st below Row 1’s chain space, ch1) to end, sc in last “butt” loop/ch sp, ch2, turn.
R3: (sc in ch sp, ch1) to end, sc in last ch sp, ch2, turn.
Repeat R3 to desired width.
On last st of last row make a slip stitch instead of a sc.
Finishing:
Weave in ends with yarn needle. Block if required. (Steam kill acrylics, if required.)
© 2012 Suzanne Resaul. I have created this as a free pattern for personal use.
Items made from this pattern may be sold. I would ask that this pattern not be copied or sold.

No comments :
Post a Comment