Sunday, March 29, 2015

The Cutest Snacks for Easter

I love the holidays. Again, I have over decorated for Easter this year. I have my plastic eggs everywhere! Anyway, this is the season for sweets. Pastel Sweets. Check out this recipe!

Layered Peeps Rice Crispy Treats by Yellow Bliss Road.


For some reason it doesn't feel like spring but it has sprung
 someone tell the weather man because it snowed yesterday! 
Since I don't feel like spring, even after I decorated, 
so, I decided to look for an uplifting snack. I love this idea.
What else do you do with Peeps.

I have only made Rice Crispy Treats once and Kristin assures me that I can do this!

Melt a 3 oz. package of Peeps with a tablespoon of butter for 45 seconds in the microwave. 
Use a large bowl because the Peeps expand.
Kristin used a different bowl for each color.


Add a cup of Rice Krispies Cereal or generic cereal and coat well.

 
Line a 8x9 loaf pan with foil wrap. 
Tip* This is a very sticky project - keep a can of cooking spray close
it helps to keep  your spatula and fingers sticky free!


Can't you just see this on your Easter table!!!

Layered Peeps Rice Krispie Treats
Author: 
Recipe type: Dessert, Easter Treat
 
Rice Krispie Treats with a twist - they're made with marshmallow Peeps and layered for a beautiful, colorful Easter treat!
Ingredients
  • 4 tablespoon butter or margarine (divided by 4)
  • 4 Marshmallow Peeps (divided by 4/different colors)
  • 6 cups Rice Krispies cereal (divided by 4)
Instructions
  1. Prepare an 8-9" loaf pan by lining with foil and spraying lightly with cooking spray.
  2. Divide the Peeps by 10s of the same color - 10 pink, 10 yellow, etc. (use any colors you like).
  3. In a medium sized microwave dish with high sides, microwave the 10 of the same color peeps and 1 tablespoon of butter on high for 45 seconds. Because microwaves vary, watch closely so the Peeps don't flow over the sides of the bowl.
  4. Stir butter and Peeps together until fully melted and incorporated.
  5. Stir in 1½ cups of cereal until fully coated. Press firmly into the loaf pan.
  6. Repeat 3-5 with the other Peeps colors.
  7. Allow to cool completely (1-2 hours) before slicing.

Please visit Kristin's blog. I know that you will enjoy yourself.

Until we meet again,
Claudia

Get the Easter feeling and decorate!


Wednesday, March 11, 2015

Loom Knitting

I found this on Pinterest:


Until We Meet Again
Claudia


Loom Knitting-Beginners Welcome

Okay, I am hooked on Loom Knitting. I have a series of youtube videos to help you get started.  Follow the link to get started: https://www.youtube.com/watch?v=7u43wfnmb3M

The crafter is know as the Good Nite Knitter.

Check it out.

I have been experimenting with different yarns.

When working with the Soft Yarns, I found that the yarns are too small in circumference and the gauge on the loom are too large, I gives the hat a too loose stitch, so, I remembered that Knit and Crochet Now! a TV show on Create TV, did a stitch and it goes like this:

 I don't know if you can see the difference in the stitches,
 

Below is the using two strands:


Below is an example of a worsted yarn is which is thicker than a "soft" yarn.


Below is an example of a "soft" yarn.


It is looser in the stitch which can be great for a summer hat, but, it you want a tighter stitch use the following:

"e-wrap" your loom three times.

Only use the bottom loop to bring up and over. It doubles the stitch up and made it thicker.

I am sorry for my bad teaching, I hope that you followed the examples. Good luck!


Until We Meet Again
Claudia


Wednesday, March 4, 2015

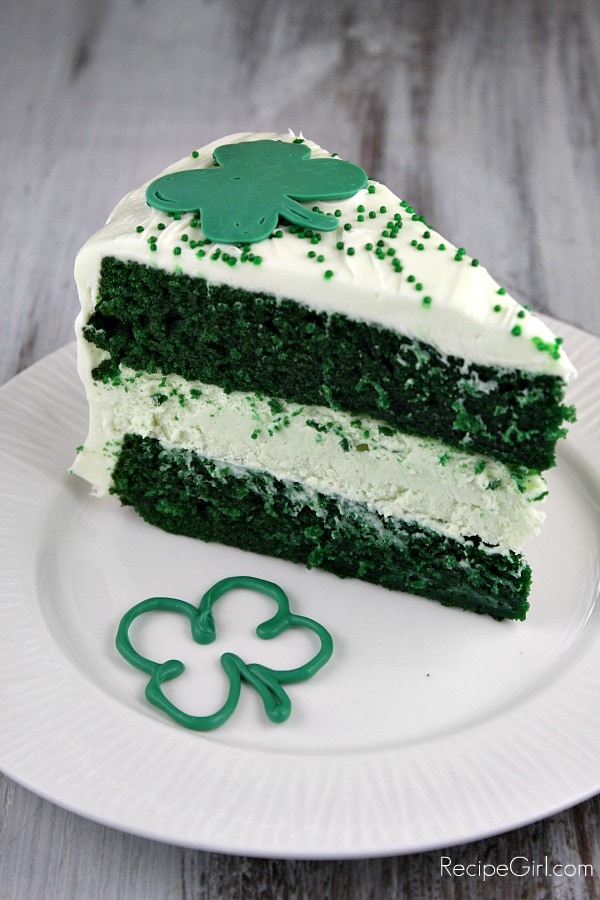
The Best St. Patrick's Day Cheesecake Cake

St. Patrick's Day is right around the corner and if you are like me I want to do something nice for my non eating Corned Beef family.

I am so excited about this recipe that I have bought everything to try it out before St. Patrick's Day.

Green Velvet Cheesecake by Recipe Girl.


I hope that it doesn't turn everyone's mouths green.


Green Velvet Cheesecake Cake

Ingredients:

Cheesecake:
Two 8-ounce packages cream cheese, at room temperature
2/3 cup granulated white sugar
pinch of salt
2 large eggs
1/3 cup sour cream
1/3 cup heavy whipping cream
1 teaspoon vanilla extract
a few drops of green food coloring, if desired
Green Velvet Cake:
2 1/2 cups all-purpose flour
2 tablespoons cocoa powder
1/2 teaspoon salt
1 1/2 cups canola or vegetable oil
1 1/2 cups granulated white sugar
2 large eggs
1 teaspoon vanilla extract
1 teaspoon white vinegar
1 teaspoon baking soda
1 cup buttermilk
2 tablespoons (1-ounce bottle) green food coloring
Frosting:
Two 8-ounce packages cream cheese, at room temperature
1/2 cup unsalted butter, at room temperature
One 7-ounce jar marshmallow creme
1 cup powdered sugar
a few drops of green food coloring, if desired

Directions:

1. Prepare the cheesecake layer: Preheat the oven to 325dgF. Place a large roasting pan on the lower third rack of the oven. Place a kettle of water on the stove to boil. Spray a 9-inch springform pan with nonstick spray and line the bottom with a round of parchment paper. Wrap a double layer of heavy duty foil around the bottom and up the sides of the pan (you want to seal it so the water from the water bath doesn’t seep into the pan).
In a large bowl, use an electric mixer to blend the cream cheese until it is smooth and creamy, 1 to 2 minutes. Mix in the sugar and salt and blend for 2 minutes, scraping down the sides of the bowl to make sure all is mixed in. Add the eggs, one at a time, blending after each addition. Finally, mix in the sour cream, whipping cream and vanilla (and food color, if using). Mix until smooth. Pour the batter into the prepared pan. Set the pan into the roasting pan in the pre-heated oven. Carefully pour the hot water from your kettle into the roasting pan. Pour enough water so that there is about an inch of water coming up the foil along the sides of the cheesecake pan.
Bake the cheesecake for 45 minutes. It should be set to the touch and not jiggly. Remove the cheesecake from the roasting pan and let it cool on a wire rack for at least an hour. When it has cooled, place the pan into the freezer and let the cheesecake freeze completely (4 to 5 hours or overnight).
2. Prepare the cake layers: Preheat the oven to 350dgF. Spray two 9-inch round pans with nonstick spray and line each pan with a round of parchment paper (see *Tips). In a medium bowl, sift together the flour, cocoa powder and salt. In a large bowl, combine the oil and sugar together and beat with an electric mixer for 2 minutes. Add the eggs, one at a time, and the vanilla, and beat for an additional 2 minutes.
In a small bowl, combine the vinegar and baking soda and stir to dissolve. Add the vinegar to the bowl, along with the buttermilk and food coloring. Beat on medium-low speed for 1 minute, until blended. Add the dry ingredients and increase speed to medium-high, scraping down the sides of the bowl while mixing, for 2 additional minutes. Divide the batter evenly between the prepared pans. Bake 30 to 35 minutes, or until a toothpick inserted into the center comes out with a few moist crumbs attached. Let the cakes cool for 20 minutes. Run a knife along the edge of the pans, then invert the cakes onto a rack to cool completely.
3. Prepare the frosting: In a large bowl, using an electric mixer on medium-high speed, combine the cream cheese and butter and beat until creamy and smooth. Add the marshmallow creme and mix until smooth. Add in the powdered sugar (and food color, if using) and continue to beat, scraping down the sides of the bowl, until all of the ingredients are mixed in and the frosting is smooth and spreadable.
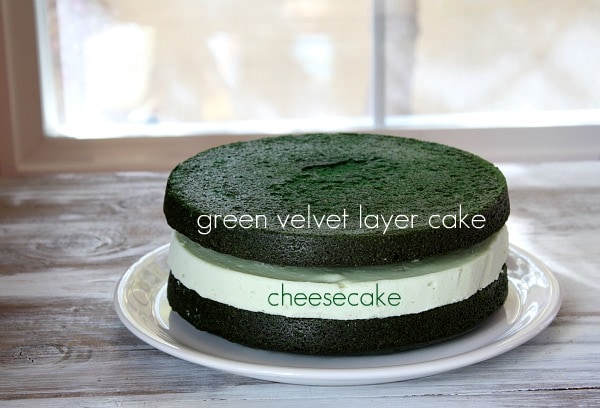
4. Assemble the cake: Place one cake layer into the center of a cake plate or platter. Remove the cheesecake from the freezer, take off the sides of the pan, and slide a knife under the parchment to remove the cheesecake from the pan. Peel off the parchment. Trim the cheesecake, as needed to match the size of your cake layers (see *Tips). Place the cheesecake layer on top of the first cake layer. Place the second cake layer on top of the cheesecake.
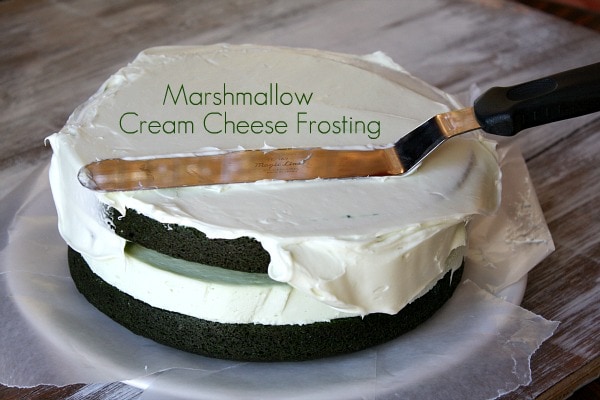
5. Frost the cake: Apply a crumb coat layer of frosting to the cake (see *Tips), and refrigerate the cake for 30 minutes, or until the frosting is set. Apply the second layer of frosting. Add a large scoop of frosting onto the top of the cake. Use a long, thin spatula or knife to spread the frosting evenly across the top and then spread it down the sides of the cake too. Decorate, as desired.

Tips:

*You can certainly bake this cheesecake in the oven without a water bath, but you run the risk of cracking the top of the cheesecake. The water bath is a safeguard against cracking.
*Measure your cheesecake layer against the cake layers. If the cheesecake layer turns out to be slightly larger size round than your cake layers, move it to a cutting board and use a knife to gently shave off some of the exterior of the cheesecake.
*How to apply a crumb coat layer of frosting: use a long, thin spatula or knife to cover the cake completely with a thin and even layer of frosting. Wipe off the spatula each time you’re about to dip it back into the bowl to get more frosting (this way you won’t be transferring any green crumbs into the bowl of frosting). Don’t worry at this point about the crumbs being visible in the frosting on the cake. When your cake has a thin layer of frosting all over it, place it into the refrigerator for 30 minutes to “set” the frosting. Once the first layer of frosting is set, apply the second layer.
*If you are serving this cake at a party, it’s perfectly okay to leave the cake at room temperature for a couple of hours (the cheesecake thaws very quickly). Otherwise, keep it stored in the refrigerator. It also freezes perfectly. Freeze it as is, then wrap it in plastic wrap and store it in the freezer until it is needed. Leftover slices may also be wrapped and frozen.
Source: RecipeGirl.com


Isn't everyone Irish on that day?


Until We Meet Again
Claudia
 

Related Posts Plugin for WordPress, Blogger...