Showing posts with label Recipe. Show all posts

Sunday, March 29, 2015

The Cutest Snacks for Easter

I love the holidays. Again, I have over decorated for Easter this year. I have my plastic eggs everywhere! Anyway, this is the season for sweets. Pastel Sweets. Check out this recipe!

Layered Peeps Rice Crispy Treats by Yellow Bliss Road.


For some reason it doesn't feel like spring but it has sprung
 someone tell the weather man because it snowed yesterday! 
Since I don't feel like spring, even after I decorated, 
so, I decided to look for an uplifting snack. I love this idea.
What else do you do with Peeps.

I have only made Rice Crispy Treats once and Kristin assures me that I can do this!

Melt a 3 oz. package of Peeps with a tablespoon of butter for 45 seconds in the microwave. 
Use a large bowl because the Peeps expand.
Kristin used a different bowl for each color.


Add a cup of Rice Krispies Cereal or generic cereal and coat well.

 
Line a 8x9 loaf pan with foil wrap. 
Tip* This is a very sticky project - keep a can of cooking spray close
it helps to keep  your spatula and fingers sticky free!


Can't you just see this on your Easter table!!!

Layered Peeps Rice Krispie Treats
Author: 
Recipe type: Dessert, Easter Treat
 
Rice Krispie Treats with a twist - they're made with marshmallow Peeps and layered for a beautiful, colorful Easter treat!
Ingredients
  • 4 tablespoon butter or margarine (divided by 4)
  • 4 Marshmallow Peeps (divided by 4/different colors)
  • 6 cups Rice Krispies cereal (divided by 4)
Instructions
  1. Prepare an 8-9" loaf pan by lining with foil and spraying lightly with cooking spray.
  2. Divide the Peeps by 10s of the same color - 10 pink, 10 yellow, etc. (use any colors you like).
  3. In a medium sized microwave dish with high sides, microwave the 10 of the same color peeps and 1 tablespoon of butter on high for 45 seconds. Because microwaves vary, watch closely so the Peeps don't flow over the sides of the bowl.
  4. Stir butter and Peeps together until fully melted and incorporated.
  5. Stir in 1½ cups of cereal until fully coated. Press firmly into the loaf pan.
  6. Repeat 3-5 with the other Peeps colors.
  7. Allow to cool completely (1-2 hours) before slicing.

Please visit Kristin's blog. I know that you will enjoy yourself.

Until we meet again,
Claudia

Get the Easter feeling and decorate!


Wednesday, March 4, 2015

The Best St. Patrick's Day Cheesecake Cake

St. Patrick's Day is right around the corner and if you are like me I want to do something nice for my non eating Corned Beef family.

I am so excited about this recipe that I have bought everything to try it out before St. Patrick's Day.

Green Velvet Cheesecake by Recipe Girl.


I hope that it doesn't turn everyone's mouths green.


Green Velvet Cheesecake Cake

Ingredients:

Cheesecake:
Two 8-ounce packages cream cheese, at room temperature
2/3 cup granulated white sugar
pinch of salt
2 large eggs
1/3 cup sour cream
1/3 cup heavy whipping cream
1 teaspoon vanilla extract
a few drops of green food coloring, if desired
Green Velvet Cake:
2 1/2 cups all-purpose flour
2 tablespoons cocoa powder
1/2 teaspoon salt
1 1/2 cups canola or vegetable oil
1 1/2 cups granulated white sugar
2 large eggs
1 teaspoon vanilla extract
1 teaspoon white vinegar
1 teaspoon baking soda
1 cup buttermilk
2 tablespoons (1-ounce bottle) green food coloring
Frosting:
Two 8-ounce packages cream cheese, at room temperature
1/2 cup unsalted butter, at room temperature
One 7-ounce jar marshmallow creme
1 cup powdered sugar
a few drops of green food coloring, if desired

Directions:

1. Prepare the cheesecake layer: Preheat the oven to 325dgF. Place a large roasting pan on the lower third rack of the oven. Place a kettle of water on the stove to boil. Spray a 9-inch springform pan with nonstick spray and line the bottom with a round of parchment paper. Wrap a double layer of heavy duty foil around the bottom and up the sides of the pan (you want to seal it so the water from the water bath doesn’t seep into the pan).
In a large bowl, use an electric mixer to blend the cream cheese until it is smooth and creamy, 1 to 2 minutes. Mix in the sugar and salt and blend for 2 minutes, scraping down the sides of the bowl to make sure all is mixed in. Add the eggs, one at a time, blending after each addition. Finally, mix in the sour cream, whipping cream and vanilla (and food color, if using). Mix until smooth. Pour the batter into the prepared pan. Set the pan into the roasting pan in the pre-heated oven. Carefully pour the hot water from your kettle into the roasting pan. Pour enough water so that there is about an inch of water coming up the foil along the sides of the cheesecake pan.
Bake the cheesecake for 45 minutes. It should be set to the touch and not jiggly. Remove the cheesecake from the roasting pan and let it cool on a wire rack for at least an hour. When it has cooled, place the pan into the freezer and let the cheesecake freeze completely (4 to 5 hours or overnight).
2. Prepare the cake layers: Preheat the oven to 350dgF. Spray two 9-inch round pans with nonstick spray and line each pan with a round of parchment paper (see *Tips). In a medium bowl, sift together the flour, cocoa powder and salt. In a large bowl, combine the oil and sugar together and beat with an electric mixer for 2 minutes. Add the eggs, one at a time, and the vanilla, and beat for an additional 2 minutes.
In a small bowl, combine the vinegar and baking soda and stir to dissolve. Add the vinegar to the bowl, along with the buttermilk and food coloring. Beat on medium-low speed for 1 minute, until blended. Add the dry ingredients and increase speed to medium-high, scraping down the sides of the bowl while mixing, for 2 additional minutes. Divide the batter evenly between the prepared pans. Bake 30 to 35 minutes, or until a toothpick inserted into the center comes out with a few moist crumbs attached. Let the cakes cool for 20 minutes. Run a knife along the edge of the pans, then invert the cakes onto a rack to cool completely.
3. Prepare the frosting: In a large bowl, using an electric mixer on medium-high speed, combine the cream cheese and butter and beat until creamy and smooth. Add the marshmallow creme and mix until smooth. Add in the powdered sugar (and food color, if using) and continue to beat, scraping down the sides of the bowl, until all of the ingredients are mixed in and the frosting is smooth and spreadable.
4. Assemble the cake: Place one cake layer into the center of a cake plate or platter. Remove the cheesecake from the freezer, take off the sides of the pan, and slide a knife under the parchment to remove the cheesecake from the pan. Peel off the parchment. Trim the cheesecake, as needed to match the size of your cake layers (see *Tips). Place the cheesecake layer on top of the first cake layer. Place the second cake layer on top of the cheesecake.
5. Frost the cake: Apply a crumb coat layer of frosting to the cake (see *Tips), and refrigerate the cake for 30 minutes, or until the frosting is set. Apply the second layer of frosting. Add a large scoop of frosting onto the top of the cake. Use a long, thin spatula or knife to spread the frosting evenly across the top and then spread it down the sides of the cake too. Decorate, as desired.

Tips:

*You can certainly bake this cheesecake in the oven without a water bath, but you run the risk of cracking the top of the cheesecake. The water bath is a safeguard against cracking.
*Measure your cheesecake layer against the cake layers. If the cheesecake layer turns out to be slightly larger size round than your cake layers, move it to a cutting board and use a knife to gently shave off some of the exterior of the cheesecake.
*How to apply a crumb coat layer of frosting: use a long, thin spatula or knife to cover the cake completely with a thin and even layer of frosting. Wipe off the spatula each time you’re about to dip it back into the bowl to get more frosting (this way you won’t be transferring any green crumbs into the bowl of frosting). Don’t worry at this point about the crumbs being visible in the frosting on the cake. When your cake has a thin layer of frosting all over it, place it into the refrigerator for 30 minutes to “set” the frosting. Once the first layer of frosting is set, apply the second layer.
*If you are serving this cake at a party, it’s perfectly okay to leave the cake at room temperature for a couple of hours (the cheesecake thaws very quickly). Otherwise, keep it stored in the refrigerator. It also freezes perfectly. Freeze it as is, then wrap it in plastic wrap and store it in the freezer until it is needed. Leftover slices may also be wrapped and frozen.
Source: RecipeGirl.com


Isn't everyone Irish on that day?


Until We Meet Again
Claudia
 

Sunday, October 12, 2014

Melted Witch Fruit Dip Recipe

I love Halloween. It is the beginning of Decorating Season!! Unfortunately I broke my foot and can't make it up and down stairs with boxes so... Halloween decor might be contained to a few pumpkins and ghouls!

But I am making this dip.

http://www.iwashyoudry.com/2013/10/25/melted-witch-chocolate-chip-cream-cheese-fruit-dip/?utm_source=feedburner&utm_medium=feed&utm_campaign=Feed:+IWashYouDry+%28I+Wash...+You+Dry%29

I found it on I wash and you dry blog.

Ingredients
  • 8 oz cream cheese, softened
  • 1/2 cup sweetened condensed milk
  • 1 cup powdered sugar
  • 1 tsp vanilla extract
  • 6 drops green food coloring (more if desired)
  • 1/4 cup mini chocolate chips
  • Oreo cookie and Hershey's Kiss for decoration
  • Fruit/Graham Crackers/Pretzels for dipping
Instructions
  1. In a large bowl beat the cream cheese with a mixer until light and fluffy (no longer clumpy), then slowly add the sweetened condensed milk. Beat until smooth. Add the powdered sugar and vanilla, mix until blended.
  2. Drop in 5-6 drops of green food coloring and mix until fully incorporated. Fold in the mini chocolate chips.
  3. Pour into serving dish. If desired, drop a couple dots of green food coloring on top and use a toothpick to swirl around to give it that "melted witch" look.
  4. Place half of an Oreo cookie on top, then top that with the Hershey's Kiss so it looks like a witches hat. Serve with fruit slices, graham crackers and/or pretzels. Store in an air tight container in the fridge. Enjoy!
 
Until we meet again,
Claudia

Sunday, August 31, 2014

Happy National Toasted Marshmallow Day

I know that you can't believe that it is National Toasted Marshmallow Day, again! I feel like it comes earlier and earlier every year!

Well, I am ready.


Tuesday, August 26, 2014

Anyone for Dessert Lemon Bars


1 cup Reduced-Fat Bisquick�
2 tablespoons powdered sugar
2 tablespoons firm margarine or butter
3/4 cup granulated sugar
1/2 cup fat free cholesterol free egg substitute , 4 egg whites or 2 eggs
1 tablespoon Reduced-Fat Bisquick�
2 teaspoons grated lemon peels
2 tablespoons lemon juice
Lemon Glaze (below)

Lemon Glaze:
3/4 powdered sugar
1 tablespoon plus 1 1/2 teaspoons lemon juice


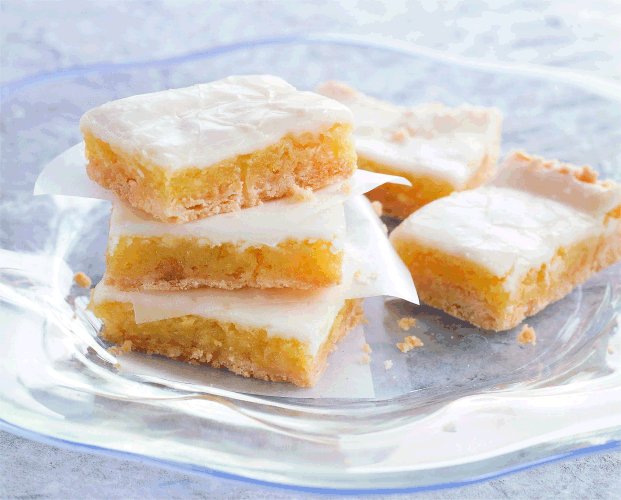
1. Heat oven to 350�. Mix 1 cup Bisquick and the powdered sugar in small bowl. Cut in margarine, using pastry blender or crisscrossing 2 knives, until mixture looks like fine crumbs. Press mixture in bottom and 1/2 inch up edges of ungreased square pan, 8 x 8 x 2 inches.

2. Bake about 10 minutes or until light brown. Mix remaining ingredients except Lemon Glaze; pour over baked layer.

3. Bake about 25 minutes or until set and golden brown. While warm, loosen edges from sides of pan. Spread with Lemon Glaze. Cool completely, about 1 hour. For bars, cut into 6 rows by 4 rows.


Lemon Glaze
3/4 cup powdered sugar
1 tablespoon plus 1 1/2 teaspoons lemon juice
Stir ingredients until smooth.

BETTY'S TIP: Here's an easy rule of thumb-one fresh lemon will give you 2 to 3 tablespoons of juice. To get the most juice out of a lemon, it should be at room temperature. Some people like to zap whole lemons in the microwave on High for about 20 seconds or so to warm them.


From "Betty Crocker's Bisquick Cookbook." Text Copyright 2000 General Mills, Inc. Used with permission of the publisher, Wiley Publishing, Inc. All Rights Reserved

Friday, May 16, 2014

If I were going to have a dinner party- Friday


If I were going to have a dinner party- Friday

Have you ever played Dinner Party? One would tell who they would like to sit next to at a dinner party and why?

Let’s play!!!
Where: 


My backyard (I wish)


Who: Now that is a great question-who would I like to sit next to or in between at a dinner party? Today I am in a fun mood so I would like to sit in between.


George Clooney. He can bring Amal, (his finance) she is an International Attorney, and can you imagine the conversations. She deals with human rights, criminal law, and extraditions. I think that she would be amazing and would enlighten the conversation. I hope that she is funny, also.


Brad Pitt. He can bring Angelina but maybe leave the kids at home.


Why? They both are quick witted. 
         
I think that the night would be filled with humor and intellect. 


Food: Recipes for Bbq.


Grilled Swordfish with Saffron Garlic Sauce and a strawberry and macadamia nut salad with asparagus.


Recipe: Ingredients


  • 1/2  cup fresh bread crumbs Bread French baguette, crust removed
  • Pinch of saffron threads, crumbled
  • 1 tablespoon hot water
  • 2 large cloves garlic, smashed
  • 1 egg yolk, preferable pasteurized
  • 1 tablespoon roasted red pepper
  • 1/2  teaspoon smoked paprika, hot or sweet
  • 3/4  teaspoon salt
  • 3/4 cup extra virgin olive oil
  • 1/8 - 1/4  teaspoon cayenne, optional
  • 4 swordfish or salmon steaks, about 1-1/2 pounds total
  • 1/2  teaspoon ground black pepper
  • 4 lemon wedge
http://www.recipe.com/grilled-swordfish-steaks-with-saffron-garlic-sauce/


Desert: Crème Caramel- it is easy and light for a summer’s night party.


Recipe:Ingredients
  • 1   recipe 
Basic Caramel
  • 2   cups whole milk
  • 1   cup heavy cream
  • 2/3  cup granulated sugar
  • 1/8  teaspoon table salt
  • 4 large eggs
  • 2 large egg yolks


  • 1   teaspoon pure vanilla extract
Basic Caramel:

·         1cup granulated sugar
  • 1/4  teaspoon fresh lemon juice


Ok now, this is make believe so here is my dress. Did I mention that it was casual?!


Wow I look good!!

What is your party? Let me know at claudiebasinger@yahoo.com

Until we meet again
Claudia
 

Related Posts Plugin for WordPress, Blogger...